
Fiber Cement Siding Installation: A Complete Guide to Tools, Materials & Best Practices
Learn everything about fiber cement siding installation — from tools and materials to step-by-step techniques. Your complete guide to a lasting, professional result. We at Allied Siding and Roofing want to share our experience with you.
If you're researching siding options for your home, fiber cement siding keeps coming up for good reason. It's durable, low-maintenance, fire-resistant, and when installed correctly, it can last 50 years or more. But the keyword there is installed correctly. Fiber cement siding is not a typical DIY material — it requires specific tools, careful attention to manufacturer specs, and a solid understanding of how walls are assembled from the inside out.
This guide covers everything you need to know about fiber cement siding installation: the tools required, the materials involved, proper technique, and the most common mistakes that lead to costly callbacks. Whether you're a homeowner evaluating contractors or a builder expanding your services, this is your complete resource.
What Is Fiber Cement Siding and Why Is It Worth It?
Fiber cement siding is a composite building material made from Portland cement, sand, and cellulose fiber. The result is a product that looks like wood but resists the things wood can't: moisture, insects, rot, and fire. It holds paint exceptionally well and is dimensionally stable in climates with wide temperature swings.
The dominant brand in the market is James Hardie, whose HardiePlank lap siding has become virtually synonymous with fiber cement in the residential construction world. James Hardie products are available in a wide range of profiles, textures, and pre-finished color options, and they come with robust installation specifications that, when followed, back a 30-year limited warranty.
The trade-off for all of these benefits is installation complexity. Fiber cement is heavy, brittle at the edges, and produces hazardous silica dust when cut. Getting it right requires the right tools, the right materials, and the right technique — all of which we'll walk through below.
Essential Tools for Fiber Cement Siding Installation
Before the first board goes up, your tool setup will determine how safe and how clean your installation goes. Cutting and fastening fiber cement requires specialized equipment — what works on vinyl or wood will either fail immediately or create a dangerous work environment.
Cutting Tools
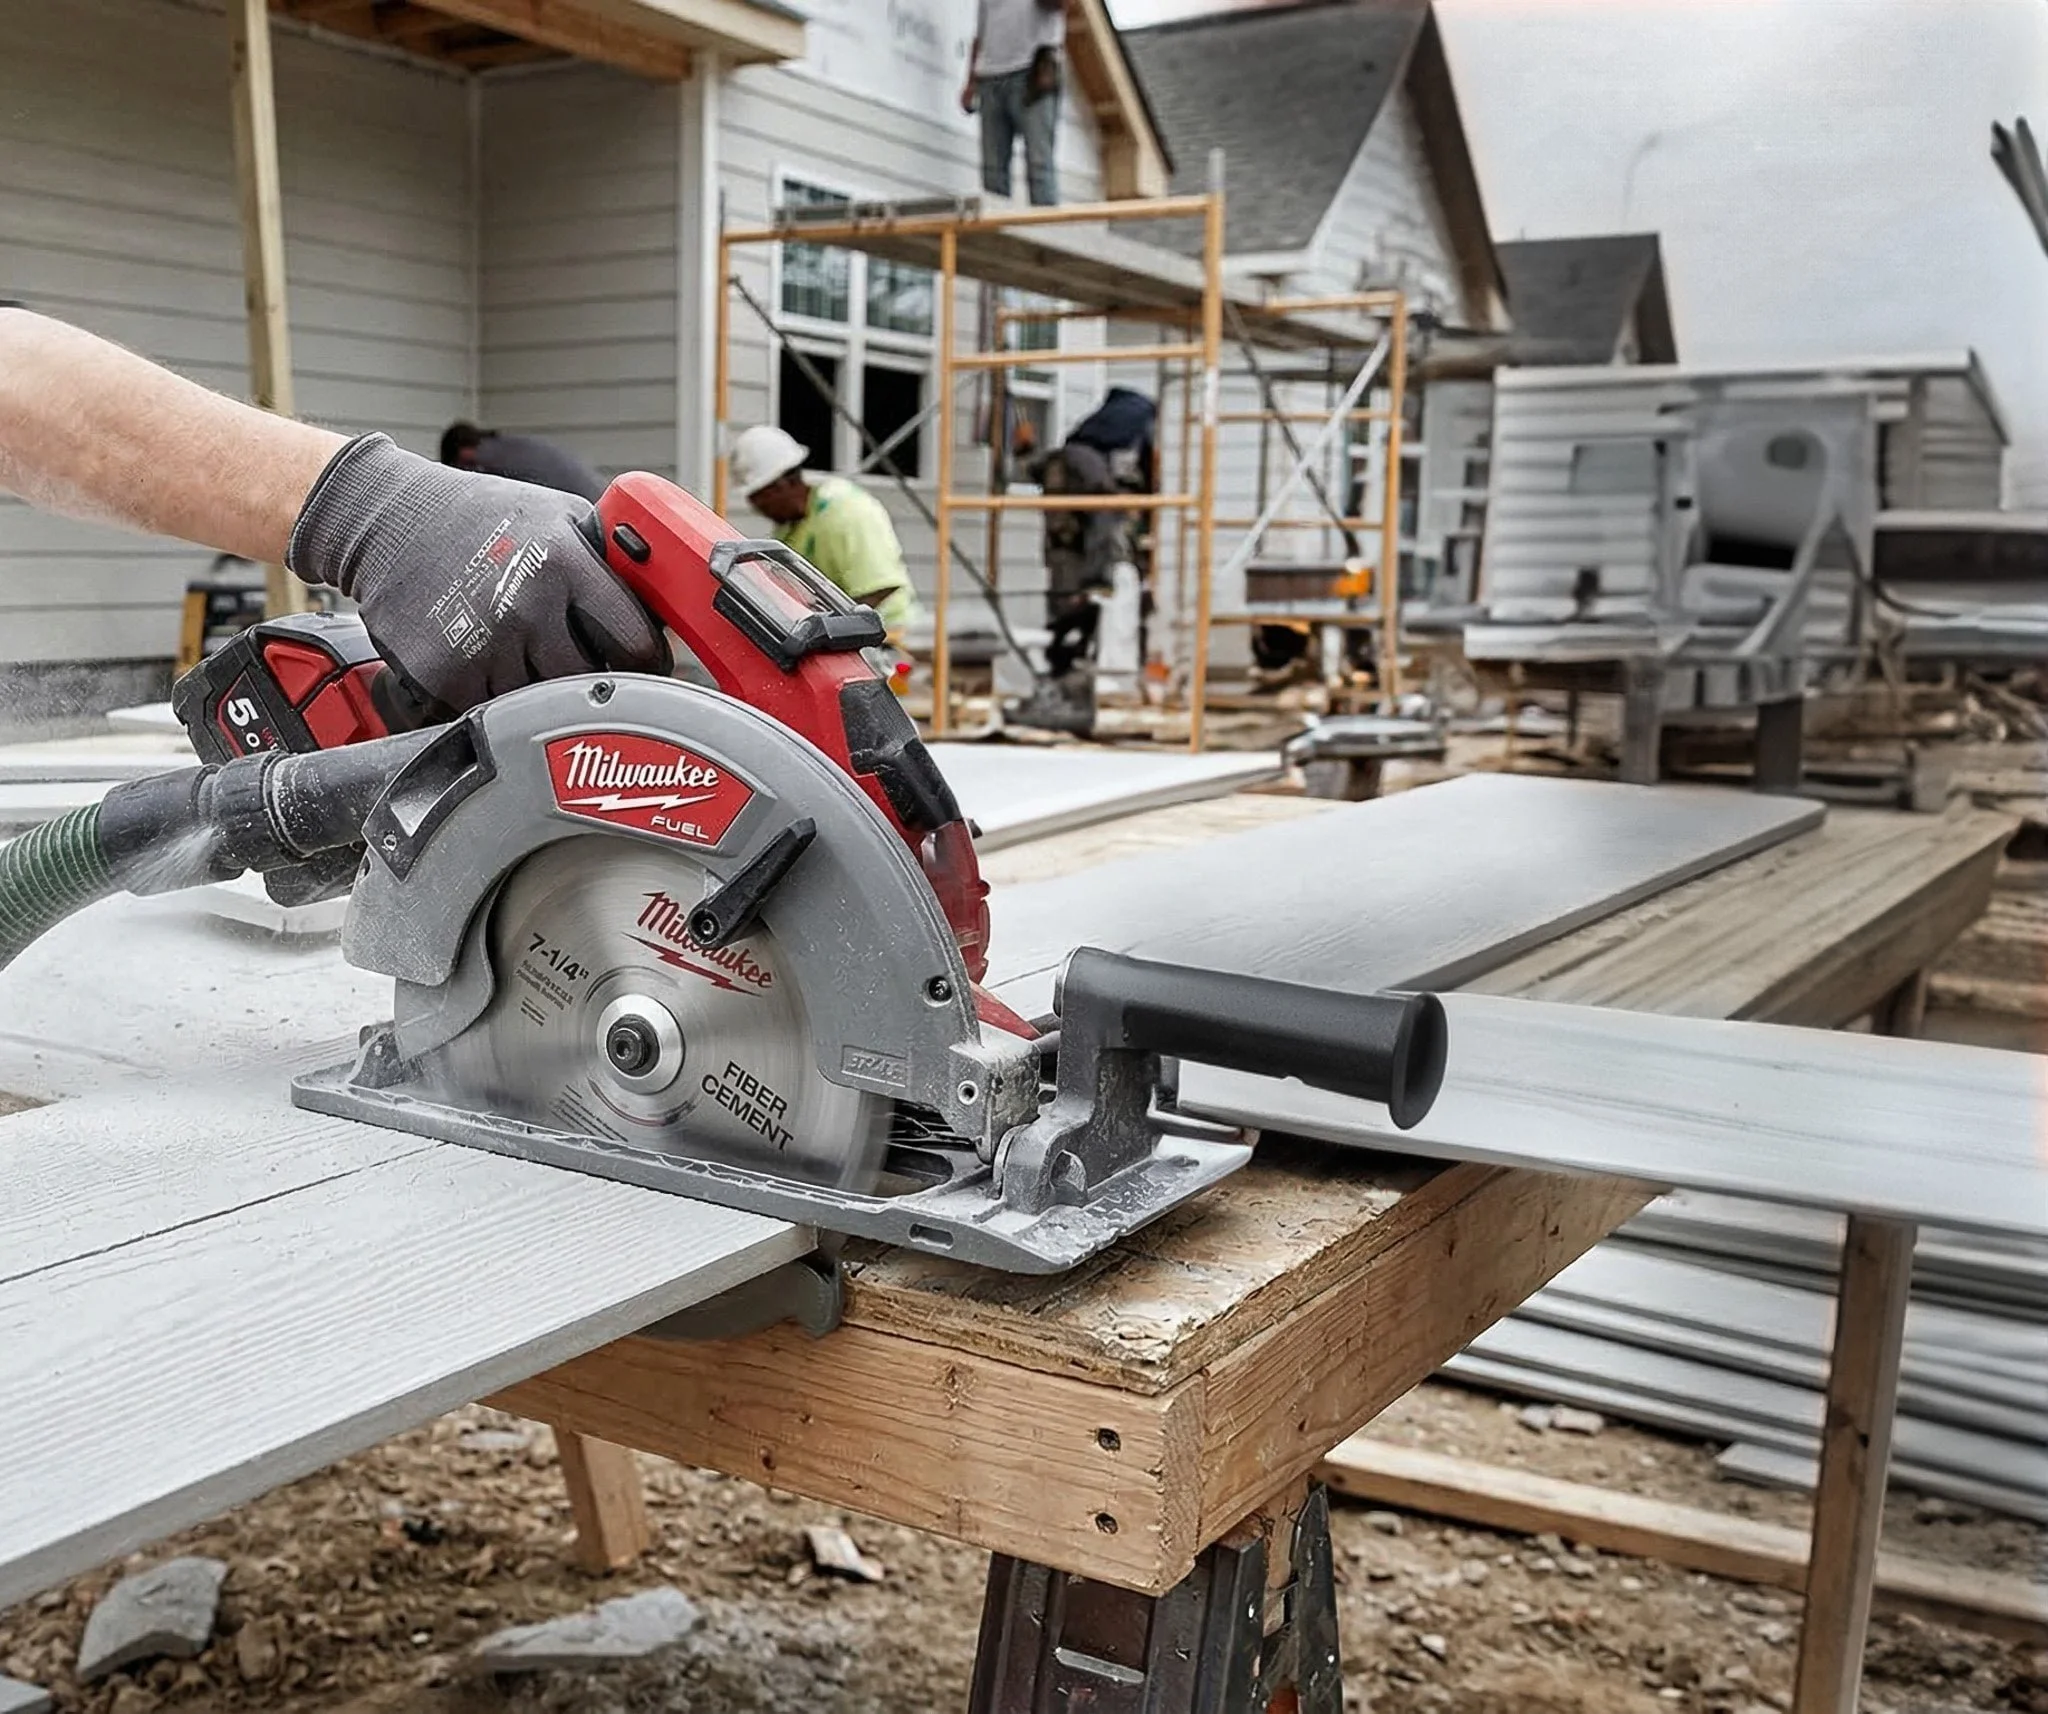
The most important cutting decision you'll make is your blade. A circular saw is the standard tool for breaking down fiber cement panels andcutting lap siding to length, but it must be paired with a diamond-tipped blade — sometimes called a polycrystalline diamond (PCD) blade. Standard carbide blades dull almost instantly on cement. A quality PCD blade, by contrast, will hold an edge through thousands of cuts and produce a clean result.
When using a circular saw on fiber cement, always cut with the face side down to minimize chipping on the finished surface, and whenever possible, set up your cuts outdoors or in a well-ventilated area away from the building envelope. Pair your saw with a dust-collecting vacuum fitted to the saw's port — this is one of the single most effective steps you can take to control silica dust at the source.
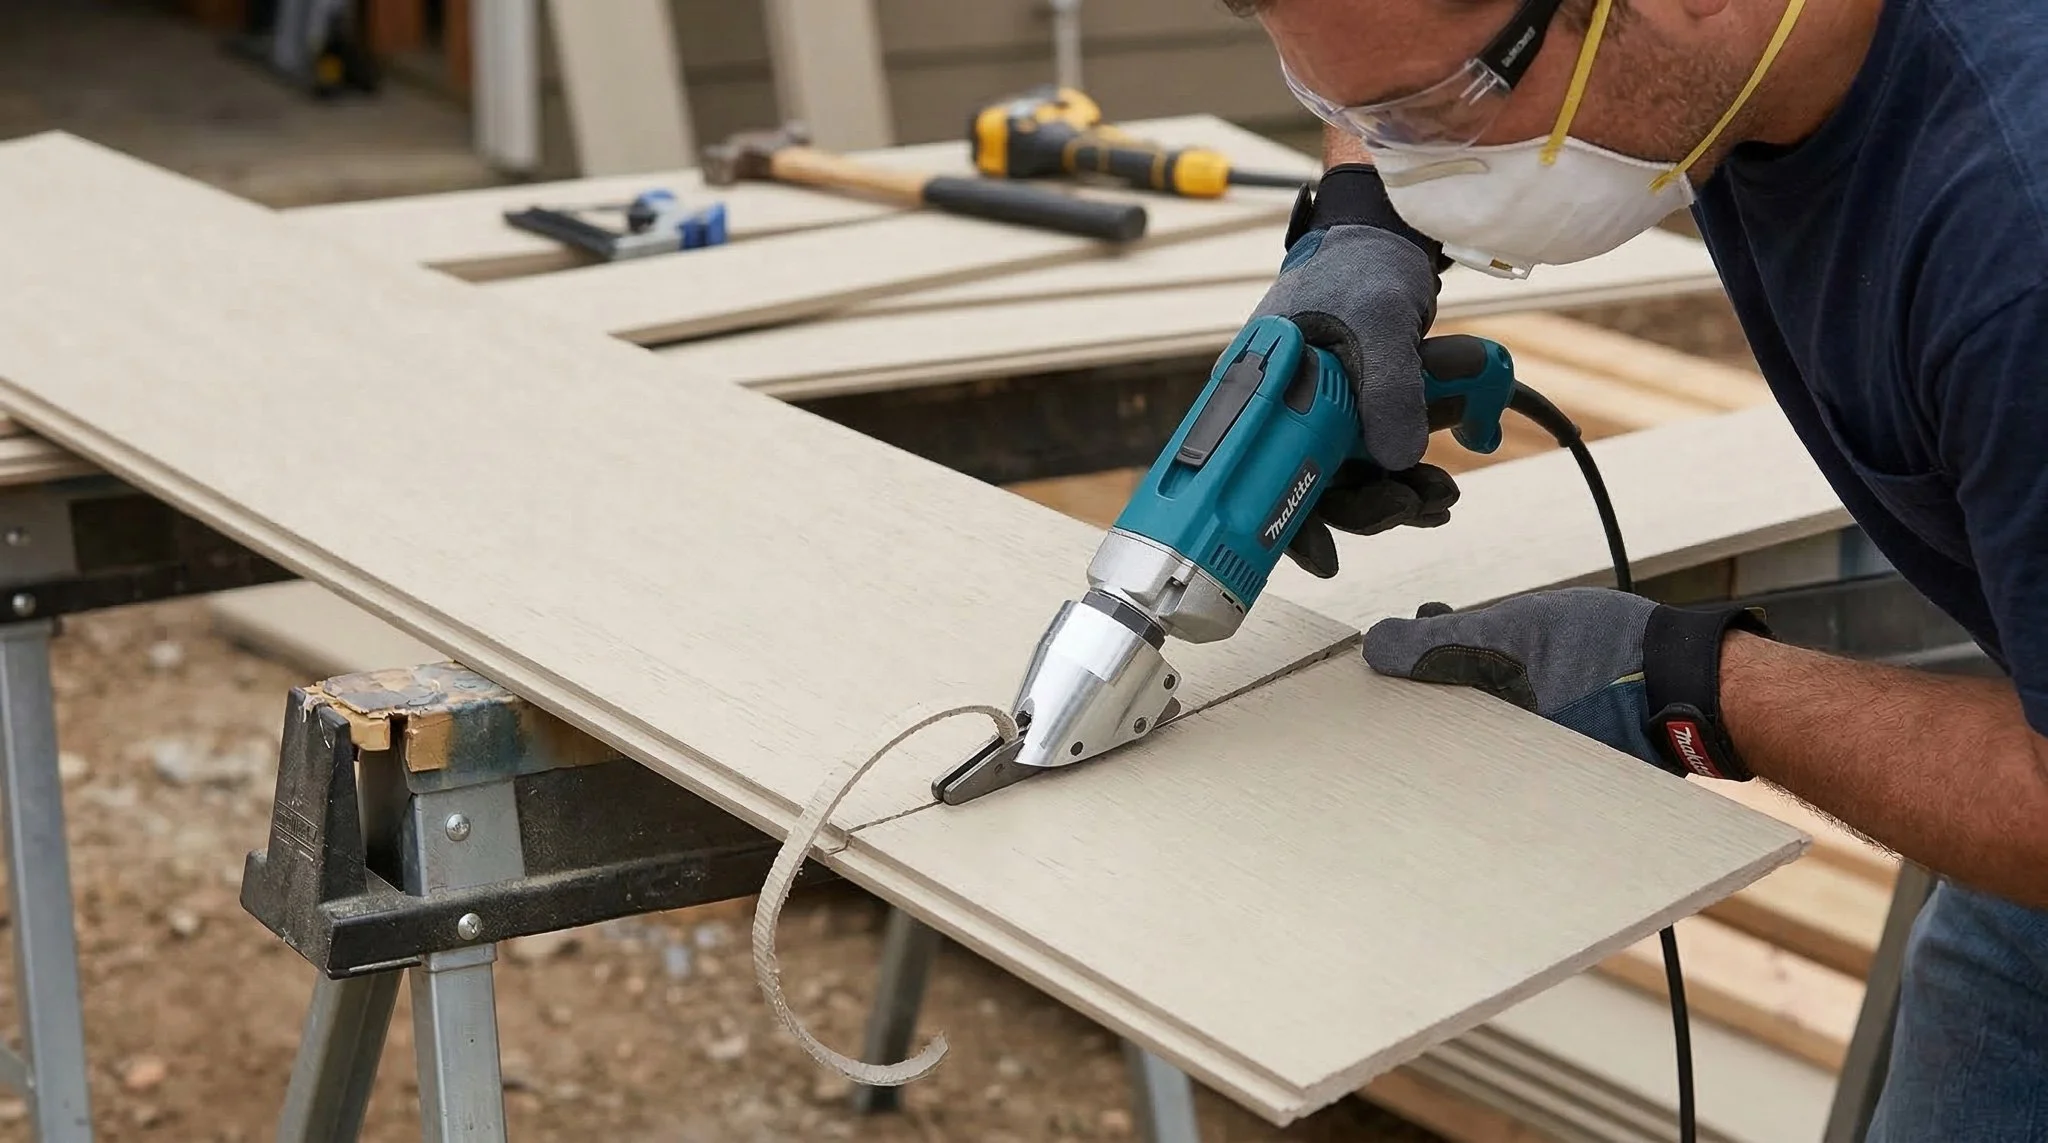
For field cuts directly on the wall — trimming around windows, doors, or other penetrations — fiber cement shearsare the preferred tool. These electric or pneumatic shears cut the material without generating the fine dust a saw produces, making them ideal for work in occupied or enclosed areas. Shears won't replace a saw for long rip cuts or large volume work, but they are an invaluable complement in any fiber cement toolkit
Fastening Tools
Speed and consistency matter when you're running hundreds of linear feet of lap siding. A pneumatic nailer (siding nail gun) set up for fiber cement delivers both. Most manufacturers, including James Hardie, have specific nailer settings and approved nail types listed in their installation guides — always confirm your nailer is set to avoid overdriving, which can crack the siding face or compromise the fastener's holding strength.
On the fastener side, galvanized or stainless steel fasteners are non-negotiable. Fiber cement retains moisture at the interface, and standard steel nails will rust, stain the siding face, and ultimately fail. Hot-dipped galvanized or stainless steel nails are required by most manufacturers to maintain warranty coverage, and they're the only fasteners that will actually last.
Safety Equipment — Don't Skip This
This deserves its own section because it's the most commonly overlooked part of fiber cement installation.
Silica dust — the fine particulate released when fiber cement is cut — is a serious occupational health hazard. Prolonged or repeated exposure to respirable crystalline silica causes silicosis, a progressive and irreversible lung disease. OSHA classifies silica dust as a known carcinogen and has strict permissible exposure limits for construction workers.
Every person in the cutting area should be wearing a properly fitted respirator — at minimum an N95, though a P100 half-face respirator is the professional standard for repetitive cutting work. Safety glasses are equally essential to protect against chips and dust. No cut is so quick that it's worth skipping either. Dust collection at the saw, outdoor cutting, and proper respiratory protection work together as a system. Use all three.
What Materials Do You Need for Fiber Cement Siding Installation?
The siding itself is only one component of a properly assembled exterior wall. Understanding the full material stack — from the studs outward — is essential to an installation that performs the way it was designed to.
Choosing Your Siding Product
James Hardie / HardiePlank offers several product lines suited to different applications: lap siding for horizontal profiles, vertical panels, and a full line of trim and soffit products designed to integrate cleanly with the field siding. For most residential re-siding and new construction projects, HardiePlank lap siding in a 6.25" or 8.25" exposure is the workhorse product.
One important note: James Hardie products are climate-zoned. HardieZone products are specifically formulated for either hot/humid or cold/freezing climates. Installing the wrong zone product voids the warranty, so confirm your regional zone before ordering.
The Wall Assembly — Working from the Inside Out
A high-performing fiber cement installation starts well behind the siding itself. Here's how a proper wall assembly comes together:
Studs form the structural backbone of the wall. James Hardie specifies maximum stud spacing of 16" on center for most lap siding applications; some thicker panel products allow 24" on center. Installing over studs that are out of spec or out of plane will result in wavy, inconsistent siding courses — a problem that no amount of finish work will hide.
Sheathing goes over the studs and provides a nailing base, structural rigidity, and a substrate for the weather barrier. OSB and plywood are both acceptable; the surface must be flat, dry, and properly fastened before any barrier or siding goes on.
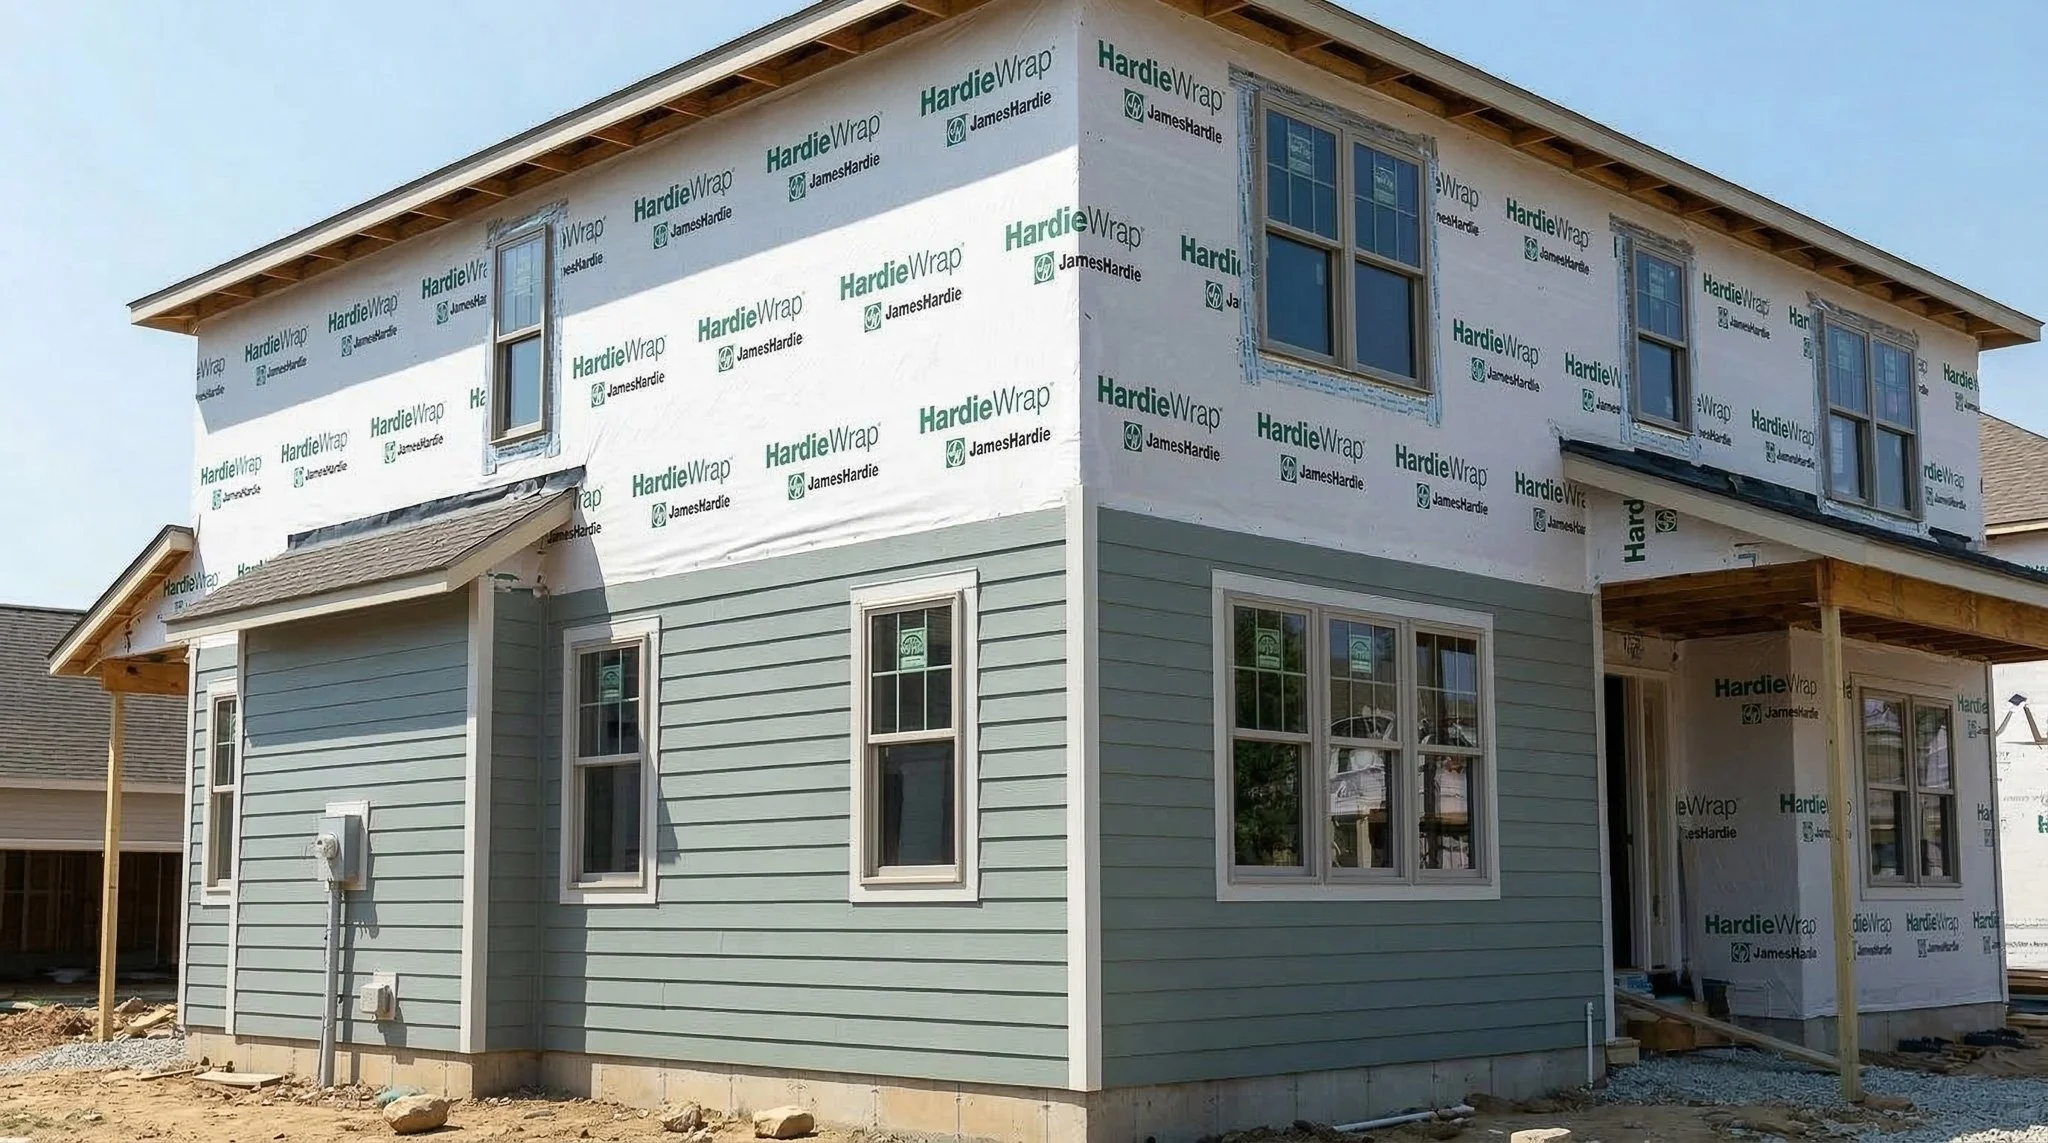
Weather-Resistant Barrier (WRB) is the layer that protects your wall assembly if water ever gets behind the siding — and over time, some always does. A quality WRB (house wrap or building paper) must be installed with horizontal courses overlapping upward, meaning upper courses lap over lower ones so water sheds down and out. Every seam should be taped per the WRB manufacturer's instructions.
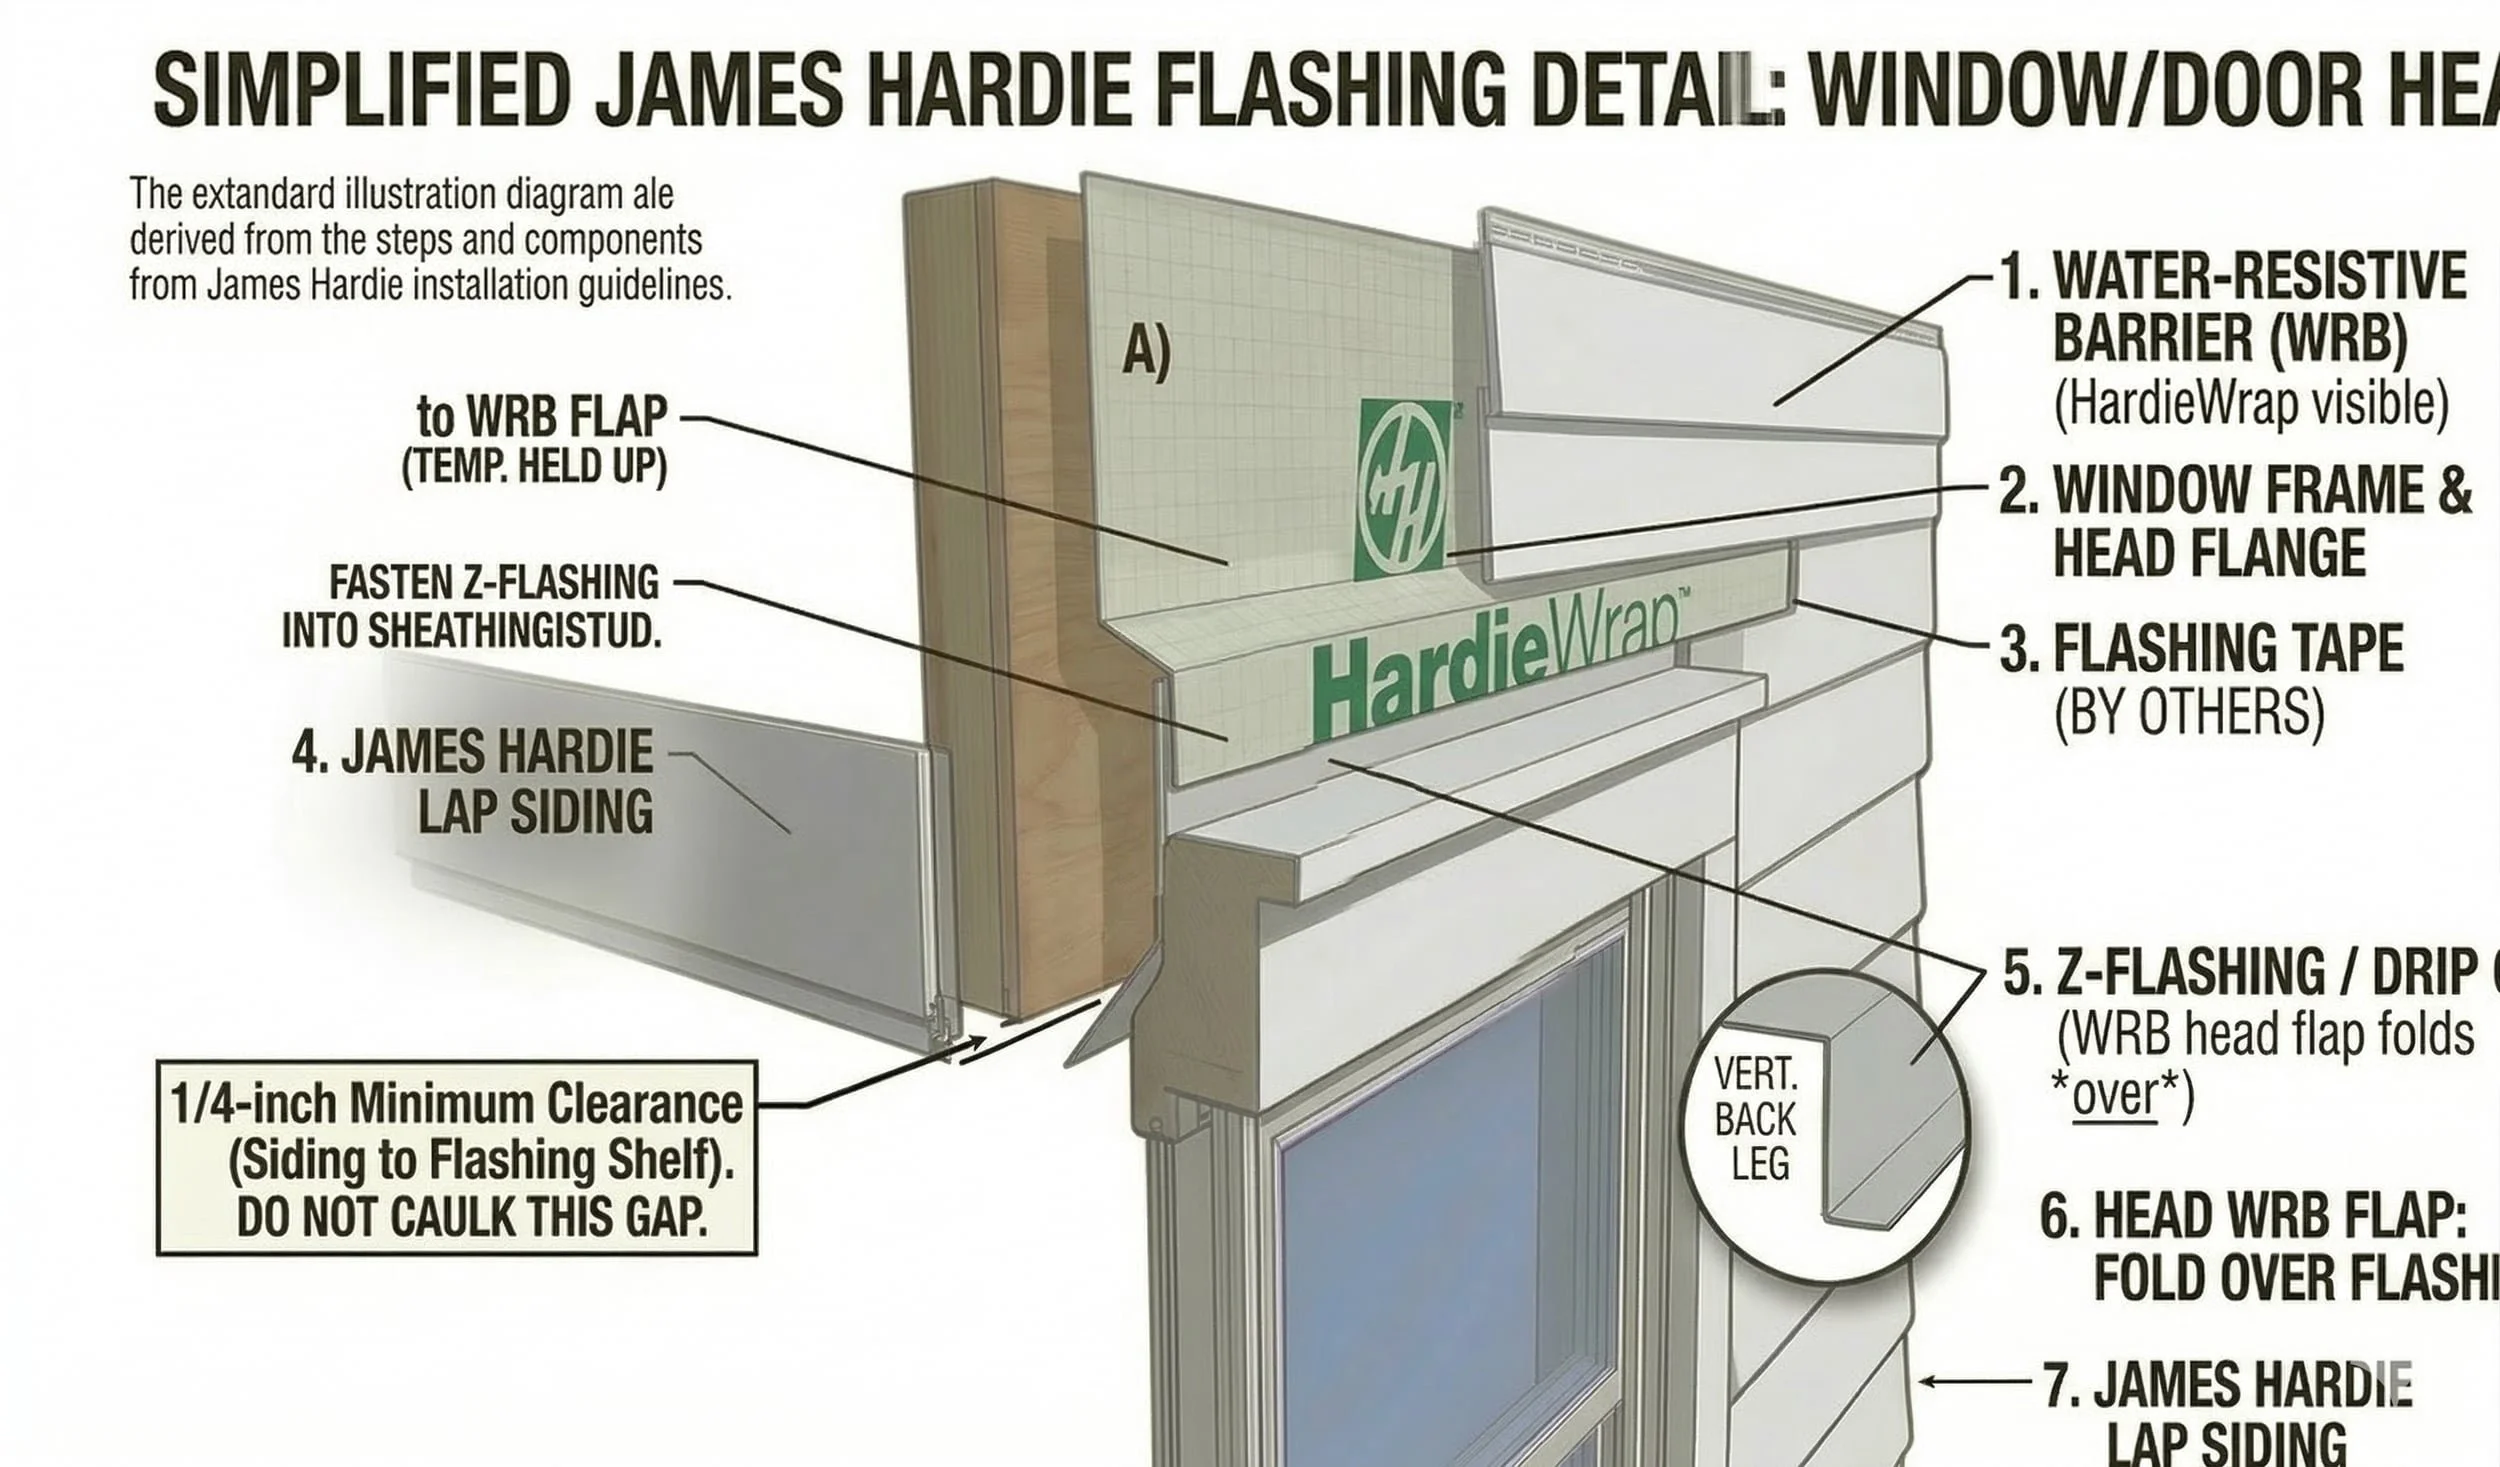
Flashing is where the majority of water intrusion failures occur. All window and door openings, penetrations, and transitions — including where siding meets a roof, deck, or foundation — require properly integrated flashing. This means pan flashing at sill plates, head flashing above windows, and kick-out flashing wherever a roof slope meets a sidewall. Flashing must be integrated into the WRB so water that reaches it is directed outward and down, not into the wall cavity.
Starter Strip, Trim, and Soffit
Before any field siding is installed, your trim and soffit should be in place. Corner trim, window and door casings, and soffit panels all need to be mounted first so the field siding can terminate cleanly against them.
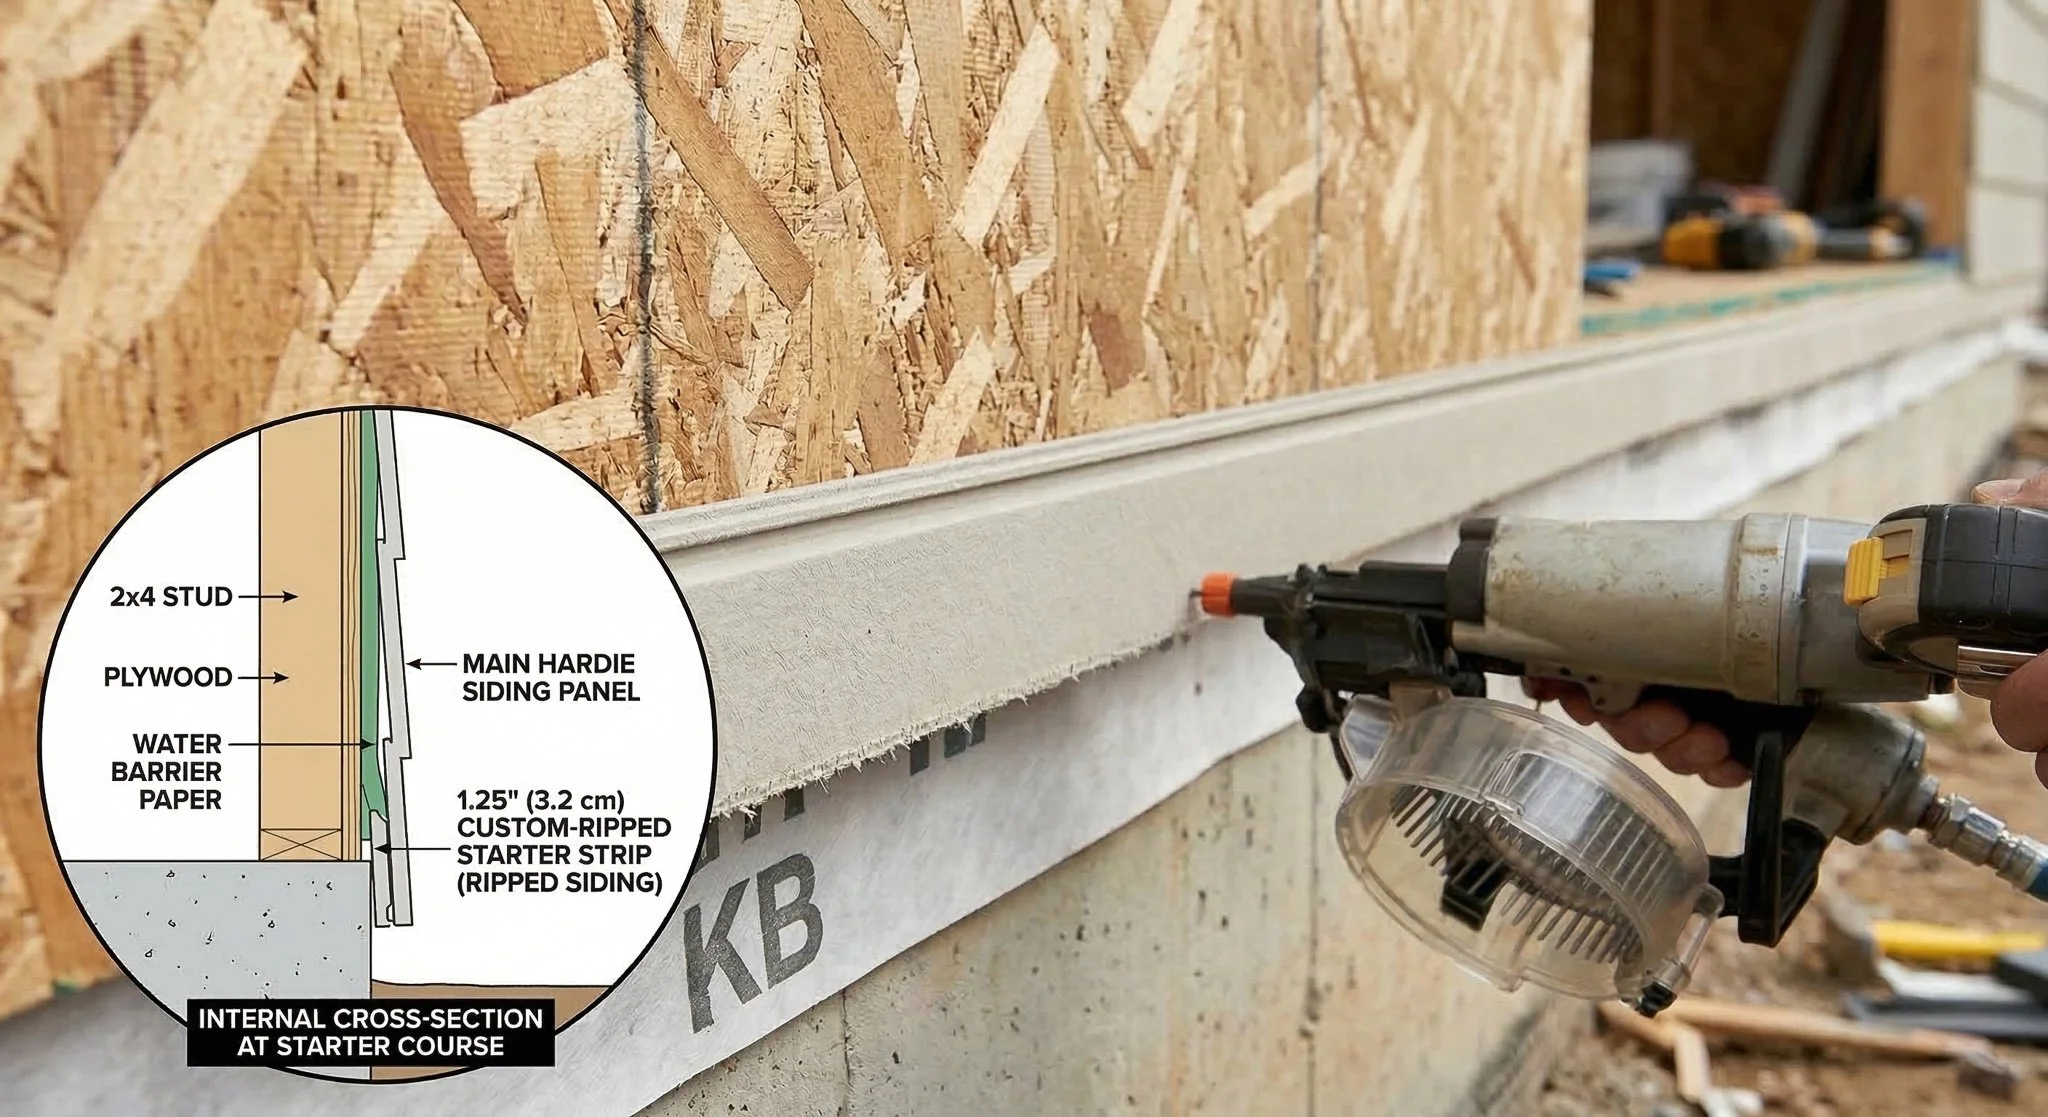
At the base of the wall, a starter strip — typically a 1.25" wide strip of fiber cement or a manufactured metal starter — establishes the angle and projection of the first course of siding. This first course sets the plane for every course above it, which is why getting it dead level across the entire wall is one of the most important steps in the whole installation. For the vast majority of homes you will want to start at the very lowest point.
How to Install Fiber Cement Siding — Step by Step
Step 1 — Prep the Wall
Before anything else, walk the entire wall surface. Check that the sheathing is flat and properly fastened, the WRB is installed with all seams taped and lapping in the correct direction, and all flashing at openings and transitions is correctly integrated. Any deficiencies here are exponentially harder to correct after siding is on the wall.
Install your trim and soffit first, then establish your starter strip level around the full perimeter of the building. Use a laser level or chalk line to confirm your baseline before nailing off.
Step 2 — Cutting the Siding
Set up your cutting station outside or under a ventilated canopy with your circular saw and diamond-tipped blade on a set of sawhorses. Connect your dust-collecting vacuum to the saw's dust port. Every person at or near the cutting station should have their respirator on before the first cut.
Cut fiber cement face-down to protect the finished surface. Measure twice — fiber cement can't be stretched and mistakes are expensive. For cuts at the wall, use fiber cement shears to minimize dust near the building.
Step 3 — Nailing Technique: Blind Nailing vs. Face Nailing
James Hardie specifies two nailing methods depending on the product and application:
Blind nailing is the preferred method for most lap siding applications. The nail is driven through the top of the plank, at the overlap zone, so it is completely covered by the course above. This produces a clean face with no visible fasteners and protects the nail head from direct weather exposure.
Face nailing is used in specific situations — typically at the bottom of the first course above the starter strip, at butt joints, or in areas where blind nailing doesn't achieve adequate fastening into a stud. When face nailing, the nail should be placed no closer than 3/8" from the edge of the board and driven flush — not countersunk — to avoid cracking.
In both cases, nails must hit a stud. Nailing into sheathing only is not an acceptable fastening point for fiber cement siding.
Step 4 — Overlap, Butt Joints, and Clearances
Overlap between courses is typically 1.25" for HardiePlank lap siding, though always confirm with the specific product's installation guide. Consistent overlap is what gives the wall a uniform, professional appearance — a story pole or gauge wheel speeds this process significantly.
Butt joints — where two planks meet end-to-end on the same course — must be staggered from course to course (minimum 24" of offset from James Hardie), and each board end must land on a stud. Butt joints should have a 1/8" gap between board ends to allow for minor movement and sealant application.
Clearance requirements protect the siding from moisture wicking. James Hardie requires a minimum of 6" clearance between the bottom edge of the siding and finished grade, 1" clearance above flat roofs or horizontal surfaces, and 2" clearance above sloped roofs. These aren't guidelines — they are warranty conditions. Inadequate clearance is one of the most common causes of premature fiber cement failure.

Step 5 — Sealing and Caulking
Once siding is installed, all butt joints, trim intersections, and penetrations need to be sealed with a compatible caulk or elastomeric sealant. James Hardie recommends a paintable, siliconized acrylic or elastomeric sealant — not pure silicone, which doesn't accept paint. OSI QUAD Max and NPC Solar Seal 900 are the most recommended in our area.
Apply a smooth, consistent bead at every point where siding meets trim. DO NOT caulk the butt joints. Those sections need to have a strip of flashing behind it. Tool the bead to ensure full contact on both surfaces. Skipping or rushing this step is an invitation for water infiltration at the most vulnerable points in the installation.
Top Fiber Cement Siding Installation Mistakes (And How to Avoid Them)
Even experienced contractors make these errors. Knowing them in advance saves callbacks, warranty headaches, and sometimes entire wall teardowns.
Skipping or improperly installing the WRB or flashing. The siding is the first line of defense, but the WRB and flashing are what actually protect the structure when water finds a path. Lapping WRB in the wrong direction or leaving flashing unsealed at a transition is a slow leak waiting to happen.
Using non-approved fasteners. Standard steel nails will rust, bleed through the paint, and eventually fail. Always use hot-dipped galvanized or stainless steel fasteners, and confirm they're on the approved fastener list for the specific James Hardie product you're installing.
Ignoring silica dust safety protocols. Silica dust exposure is cumulative and irreversible. Running cuts without a respirator or dust collection — even on a short job — contributes to long-term health risk. Protect your crew every time, on every cut.
Incorrect clearances. Installing siding too close to grade, rooflines, or horizontal surfaces is one of the most common ways to void a fiber cement warranty and cause premature deterioration. Measure and document clearances before final inspection.
How to Maintain Fiber Cement Siding After Installation
One of fiber cement's greatest advantages is its low maintenance profile compared to wood. That said, "low maintenance" isn't "no maintenance."
Repaint on schedule. Prefinished James Hardie products are factory-coated and typically hold color well for 15–20 years, but field-painted fiber cement may need refreshing sooner depending on sun exposure and climate. Paint is the primary weather barrier for the siding surface, so don't let it go past its service life.
Inspect your caulk and elastomeric sealant annually, trim intersections, and around penetrations. Sealant ages faster than the siding itself and should be refreshed wherever it shows cracking or separation.
Check clearances after any changes to the landscaping or grade around the foundation. Mulch that piles up against siding, or grade changes that reduce your 6" clearance, can lead to moisture problems that could have been easily avoided.
Frequently Asked Questions About Fiber Cement Siding Installation
Can I cut fiber cement siding with a regular circular saw blade? No. Standard carbide blades will dull almost immediately on fiber cement. You need a diamond-tipped (polycrystalline diamond) blade for circular saw cuts, or fiber cement shears for smaller, on-site cuts.
Is fiber cement siding a DIY project? It can be for an experienced DIYer, but it's not a beginner project. The material is heavy, the cutting produces hazardous silica dust that requires proper respiratory protection, and the installation details — flashing, clearances, nailing patterns — are precise. Mistakes are difficult and expensive to correct. Most homeowners are better served by hiring an experienced contractor.
How long does fiber cement siding last? When properly installed and maintained, fiber cement siding can last 50 years or more. James Hardie backs their products with a 30-year limited warranty on the product itself.
What is the difference between blind nailing and face nailing on HardiePlank? Blind nailing places the fastener at the top of the plank where it will be covered by the next course — producing a clean face with no visible nails. Face nailing drives the fastener through the face of the board and is used in specific situations such as the first course or at butt joints where blind nailing isn't achievable.
What clearance is required between fiber cement siding and the ground? James Hardie requires a minimum of 6" clearance between the bottom edge of the siding and finished grade. This prevents moisture wicking and protects the siding's long-term performance.
Do I need a WRB under fiber cement siding? Yes. A Weather-Resistant Barrier is required under fiber cement siding and is a condition of the James Hardie warranty and also required by Michigan code rules. The WRB protects the wall assembly from any water that penetrates behind the siding surface.
Ready to Install Fiber Cement Siding on Your Home?
Fiber cement siding is one of the best investments you can make in your home's exterior — but only when it's installed the right way. The right tools, the right materials, and a thorough understanding of the details that matter are what separate an installation that lasts decades from one that causes problems in a few years.
At Allied Siding and Roofing, we specialize in professional fiber cement siding installation using James Hardie products and installation best practices. From proper WRB and flashing integration to precise blind nailing and clearance compliance, we build exteriors that are designed to perform and built to last.
Contact us today for a free quote and let us show you what a properly installed exterior looks like.
Allied Siding and Roofing is a local family-owned and operated roofing company specializing in James Hardie installation and other exterior needs such as roofing, decking, and porch extensions. We are a James Hardie Elite Preferred company which means we have extensive experience and education in installation and choosing the right products for our customers. If you’re located in the Metro Detroit Area, contact us at (248) 814-2852 or visit our website https://www.buildwithallied.com for more information on how we can collaborate on your dream home!